Focus the lens; you’ll find the fix.
Turn footage into clear corrections – without drowning in technical detail.
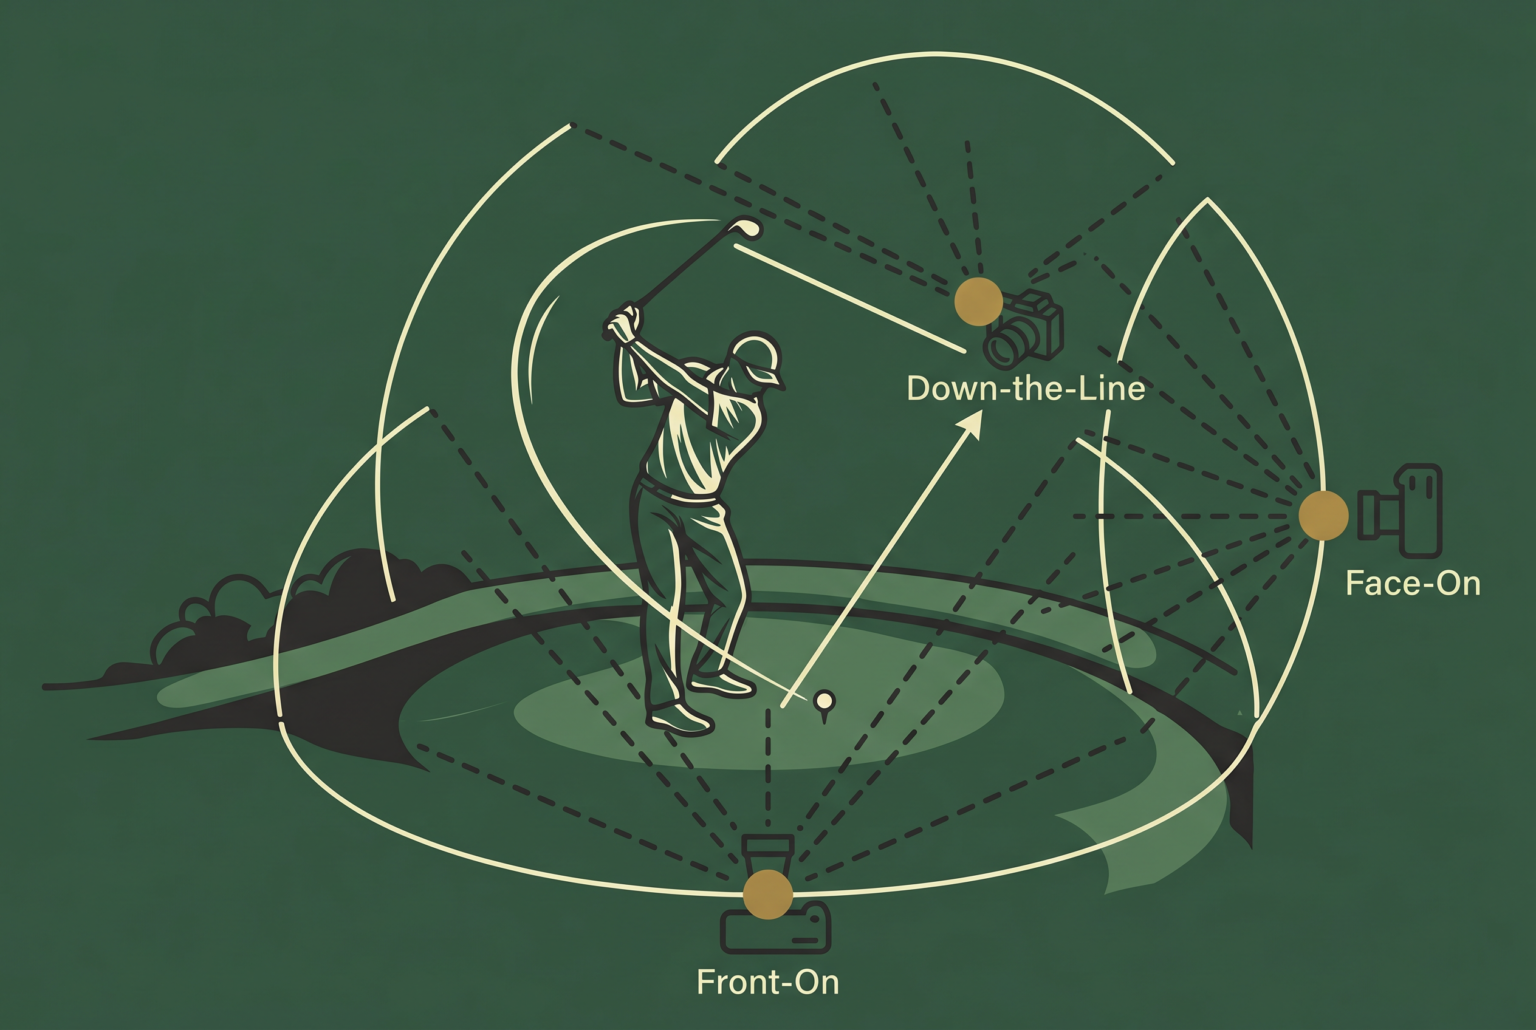
Set up your camera the right way
- Capture two dependable angles: face-on (looking at your target from roughly chest height) and down-the-line (DL) from behind and slightly to the side. If you can only record one angle at first, start with DL, then add face-on as you progress.
- Shoot in landscape on a steady tripod or stable surface. Aim for 1080p at 60fps when possible for smooth slow-motion playback; ensure the horizon is level and there’s minimal glare.
- Position matters. For DL, stand about 8–12 feet behind the ball and parallel to the target line; for face-on, align roughly with your sternum at ball level. Keep the camera in a similar spot session to session so comparisons are meaningful.
- Lighting and background count. Record in a well-lit area with a clean background to avoid distractions on the screen.
Pro Tip. use a simple grid or level on screen to keep your angles consistent between sessions.
What ‘good angle’ means for beginners
- Face-on view: helps you read the clubface at address, how the wrists hinge, and how the body rotates through impact.
- Down-the-line view: reveals swing path, alignment of the club shaft, and weight transfer during the transition.
- Consistency beats complexity. A single, repeatable angle that you can reproduce weekly will yield clearer progress than a perfect but inconsistent setup.
- Keep both angles the same distance from the ball across sessions so you’re comparing apples with apples.
One-thing review: setup, tempo, impact, finish Setup
- Check ball position relative to the centre of your stance: irons around the centre; longer clubs slightly forward. Ensure your posture is athletic with relaxed grip pressure and a slight tilt of the spine away from the ball.
- The cue is simple: set up the shot you intend to repeat. If you’re teaching yourself, a consistent setup is worth mastering before you chase swing changes.
Tempo
- Aim for a smooth, deliberate takeaway and a clear transition into the downswing. A popular cue is a three-to-one feel: roughly three counts to the top, one to impact.
- A practical drill: practice with a metronome set to a comfortable tempo (60–72 BPM) and swing in rhythm with the clicks. This helps you avoid jerky, fast hands.
Impact
- At impact, watch the face relative to the target line and the shaft lean. A square face and a stable spine usually produce cleaner contact.
- If your video shows the face opening or closing early, focus on returning the hands slightly slower into impact and maintaining a quiet head.
Finish
- Finish with balanced posture, chest facing the target, and weight slightly on the front foot. A good finish often mirrors a comfortable practice swing rather than a forced position.
Pro Tip. pick one target to measure in each review. For example, this week you focus on tempo; next week you add hand-path awareness. Layering improvements prevents overload.
Frame-by-frame feedback without panic
- Save the clip and mark four anchor moments: at address, at the top of the backswing, at impact, and at finish. If you can’t mark exactly, use the moment of maximum coil (top) and the moment of closest approach to the ball (impact).
- Play in slow motion (0.25x to 0.5x) to inspect key details, then pause on the frame that best illustrates the issue you’re addressing.
- Read the image in small, actionable chunks. Note, for example: “face a touch closed at impact,” or “too steep a swing path,” or “not finishing through.”
- Don’t chase every micro-movement. The aim is clarity: one or two clear corrections per session will stick more effectively than a long list.
Pro Tip. keep a one-page mini-review. State one observation, one adjustment, and one drill to carry into your next session.
How to compare swings across weeks
- Use a repeatable setup each week. Keep the same camera positions, lighting, and ball position. If you change these, you swap the baseline you’re measuring against.
- Build a simple rubric: Setup, Tempo, Impact, Finish. Rate each area from 1 to 5, and note one concrete improvement or lingering issue per week.
- Create a visual log. Keep the weekly clip under the same lighting and background. Even a small, clean comparison over a few weeks reveals trends that raw numbers cannot.
- Pair with a short drill sequence. After you review, pick 1 drill to address the week’s single focus, and record again to confirm the effect.
Common recording mistakes
- Too close or too high. If the clubhead or head fills the frame, you miss critical details at contact and through the finish.
- Wrong angle or inconsistent distance. Shifts in angle create misleading impressions of path and face alignment.
- Unbalanced or windy backgrounds. A moving tree or people in the frame distract the eye and complicate evaluation.
- Shutter speed issues. Very low lighting with a high shutter speed causes choppy video; higher light or a lower shutter speed helps.
- Forgetting to capture the finish. The finish holds essential cues about weight transfer and extension.
Linking video to drills
- Path issues. Use the Swing Plane Drill with alignment sticks laid along the target line to guide your path and prevent an overly steep or across-the-ball path.
- Face-angle issues. Pair video reviews with a simple Face Alignment Drill: place a second stick to act as a visual guide for the clubface, ensuring the face stays square through impact.
- Width and posture. The Toe-Up Drill can help you feel the correct wrist release and prevent early extension.
- Always map a video observation to a drill you can perform at home, then re-record to verify the change.
When to bring your coach to review
- After you’ve built a clear baseline and can spot your own week-to-week changes with reasonable accuracy.
- If you feel your progress stalls for 3–4 weeks despite consistent practice and drills.
- If you consistently misinterpret the footage or feel uncertain about which correction to try next.
What’s next
- Tempo and timing in the golf swing. A practical guide to pacing your swing and sequencing your moves for repeatable results.