
Set the stage; the swing finds the room.
A small address adjustment can fix mishits from day one—without overhauling your swing.
What “athletic” really looks like at address
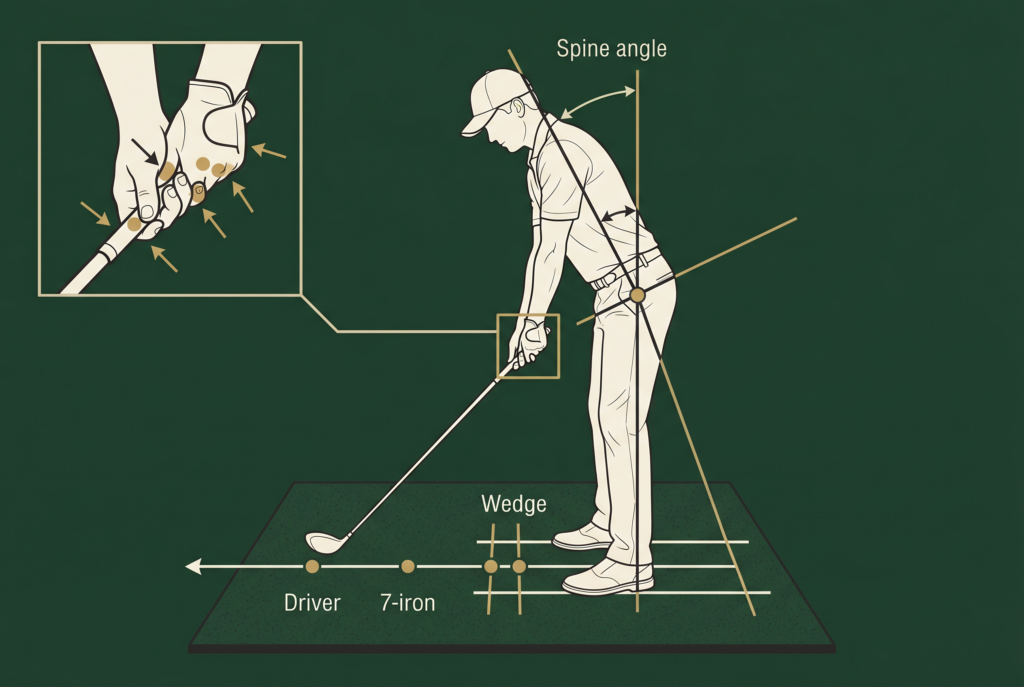
An athletic setup is the starting line for every good ball strike. Think of balance, flow, and a quiet spine before the hands ever move. Feet shoulder-width apart, knees softly flexed, weight roughly evenly distributed between front and back foot. Your spine should tilt slightly away from the target, not slump or lean back like a sitter on a chair. Hips hinged, with your upper body tall but relaxed, and the chin level enough to let your eyes drop naturally to the ball. Arms hang naturally, feeling connected to the torso rather than locked straight down the shaft. The clubhead rests close to the ball, not behind it, giving you a crisp sense of where contact will begin.
- Settle in with a relaxed grip and a quiet breath.
- Eyes level and focused on the back of the ball.
- Distance to the ball should feel natural for your height and arm length—not reaching, not collapsing.
Pro Tip. Treat your spine as the axis of the setup. If you feel locked or hunched, adjust your stance width slightly and soften the knee bend until you sense room to rotate and lead with the chest.
Grip pressure: secure, not tense
Grip pressure is the hinge between a comfortable setup and repeatable contact. Too tight a grip tenses the wrists, shortens the arc, and erodes impulse control through impact. Too light a grip invites the hands to “hand over” the club on the way down.
- Most beginners benefit from a middle-ground grip pressure, in the range of 4–5 on a 10-point scale.
- Two-handed grip: choose the interlock or overlap that keeps your wrists quiet and your palms speaking to each other in harmony.
- The hands should feel connected to the club, not glued to the fingers.
Pro Tip. If your knuckles start whitening or you notice tremor in the wrists, loosen slightly and re-check your balance. A quick check is to swing the club a few inches and feel how light the handle can feel in the fingers.
Ball position by club and why it matters
Ball position in your stance governs where the clubface meets the ball and how the shaft leans at impact. Too far forward or too far back can push you toward either thin mishits or fat strikes.
- Driver: Ball forward of centre, roughly aligned with the inside of your lead heel. This encourages a shallow angle of attack and solid contact at higher tee heights.
- Long irons (2–4 iron): Ball slightly forward of centre, nearer the inside of the lead heel. You want a touch more forward posture to promote a clean strike.
- Mid irons (5–7 iron): Ball near centre to slightly forward of centre. A balanced position helps ensure a crisp, ascending strike path.
- Short irons and wedges (8–PW): Ball near centre or slightly back of centre in your stance. This supports a slightly steeper angle of attack for precise, descending contact.
Why it matters: the club’s leading edge wants to meet the ball when your weight is under control and your spine angle is preserved. When the ball sits either too far forward or too far back, your contact loses its predictability.
Stance and alignment: feet, hips, and shoulders
Alignment is the map to your target. If your body is parallel to the target line but your feet are off, the path you produce will wander.
- Feet: shoulder-width apart for most irons; slightly wider for drivers for stability.
- Hips and shoulders: align parallel to the intended target line. A subtle toe-out for the feet can help with comfort during takeaway, but keep the pelvis square.
- Visual checks: lay a club on the ground pointing to the target; make sure your feet, hips, and shoulders are aligned to that line.
- Don’t twist your hips open ahead of the ball in a way that you chase the ball with your body. The motion should be a turn from the torso around a stable spine.
Pro Tip. Always check your alignment from behind the ball with a mirror or a putting mirror image of a club. Seeing yourself in the line helps you build trust in your setup.
The spine angle and head position checklist
Preserving spine angle from address through impact is critical for repeatable contact. The head position has to stay relatively quiet—the goal is a stable anchor that allows the arms to swing freely.
Checklist:
- Maintain your spine tilt you set at address; avoid standing straighter as you swing.
- Keep your head steady, with the eyes focused on the ball until after contact.
- Let the weight stay slightly onto the lead foot as you move through impact, not jumping forward or up.
Common cues: feel your shoulders rotate under the chin; your trail shoulder drops slightly into the backswing; your eyes stay fixed on the ball.
Pro Tip. If you tend to lift your head or “pop up” early, practise with a small cross-drill: place a headcover behind the ball and aim to keep your head in line with the ball through impact. You’ll feel the difference in whom the contact begins with.
Tempo cues at address (before you swing)
A calm, repeatable pre-swing sets the stage for clean contact. The aim is a smooth, consistent rhythm that every club can honour.
- Start with a relaxed breath to shed tension.
- Pause briefly at the top of the backswing to confirm your balance and swing direction.
- Use a 3:1 backswing to downswing ratio as a rough guide — three parts back, one part down. The idea is to feel the downswing accelerate naturally from a comfortable pause.
- Initiate the downswing with a smooth body rotation, not a clenched arm yank.
- Think: hips lead the turn, arms follow, eyes stay on the ball.
What you feel at the address should carry into the swing. The tempo cue is less about timing and more about maintaining a dependable rhythm that never forces the body.
Common beginner contact faults and quick fixes
Mishits are part of learning. Here are the frequent culprits and practical fixes you can apply on the range.
- Fat shots (ground first): fix by preserving spine angle, keeping eyes on the ball, and ensuring the weight shifts toward the lead foot during impact.
- Thin shots (ball top trajectory): fix by settling weight slightly forward, keeping a steady head, and encouraging a modest, downward strike with mid-irons.
- Hitting behind the ball: fix by a small, deliberate forward press of the hands and a tiny feel of “sweeping” the turf rather than “digging” into it.
- Out-to-in path with the clubface open: fix by using alignment sticks to ensure your feet, hips, and shoulders point to the target, and close the face slowly through impact.
- Early head lift: fix by sustaining a quiet head until contact and using a small “gate” drill (two tees forming a path) to feel a straight line through the ball.
- Drill note: gate drill and alignment-stick checks work well for beginners to cement proper path and alignment during address and through impact.
What’s next: deepen your practice with a structured pre-shot routine that hails discipline from the first rehearsal to the moment of impact. Look for guides on building a repeatable pre-shot routine.